


So you’ve decided that you want to take your DSLR Camera and a laptop/tablet with you on your backpacking journey, But every DSLR camera bag you look at is too expensive or doesn’t fit your laptop as well, and now your left with the conundrum on what type of bag to get that stores your precious technology.
You want something that isn’t to hard to carry and more importantly doesn’t scream
“HEY LOOK AT ME I’M CARRYING A BAG FULL OF EXPENSIVE CAMERA EQUIPMENT”
My Requirements
- Must be comfortable to carry
- I wanted a messenger bag not a backpack, as I felt it would be more secure and easier to carry in transit with my main pack.
- Must not look obviously like a Camera or Laptop bag (I didn’t want to be walking around Latin America with a bag with big CANON letters on it, that’s just asking to be robbed)
- Must have room for general purpose things I might need during the day, Eg Sweater, a piece of fruit etc.
- Bonus: be lockable so that I can lock it when I’m sleeping on a bus (So there is less chance of my stuff going walkies)
What it had to carry
- My 11 inch netbook in neoprene case
- My D SLR Camera (Canon Rebel XS) with 2 lenses
- My Compact camera
- spare battery for both of my camera’s
- Gorilla Pod mini tripod
- Still have room for a sweater or a piece of fruit or anything else I want to carry when I’m out
- Room for a guidebook
- Bonus: Room for my water bottle
The Choices
6,7 and 8 Million Dollar Bag – By Crumpler

7 Million Dollar home bag by Crumpler
Price:
From my research the 7 Million dollar home is the perfect size for carrying a under 13 inch laptop and a DSLR.
If you are still undecided between the sizing of the 6,7 and 8 million dollar home there are lots of youtube video reviews comparing the different sizes.
Snoop Camera Messenger – by Timbuk2

Timbuk2 Snoop Camera Messenger
Price: $135- 169
Customizable colours, materials etc, the Timbuk2 bags look amazing the only thing that really deterred me was their hefty price tag.
Passport Sling – By Lowepro

Passport Sling by Lowepro

Lowepro Passport Sling II
Price around $60
For more information check out Lowepro official website
This looks like a pretty cool bag also relatively cheap. I wasn’t really looking for a sling bag so this wasn’t for me.
DIY DSLR Messenger Bag
So after countless hours scouring the internet for a camera bag that didn’t look like a camera bag I came to the realization that If I wanted a bag that didn’t look like a camera bag then……. Don’t get a camera bag.
I came across a really interesting thread on the Photography On the Net forums where there was an enormous thread going on about this very issue, Many of them had came to the conclusion that making A DIY bag best suited their needs and was way cheaper than some of the more expensive bags like Timbuk2.
The Beauty of doing it this way is you can choose practically any standard messenger bag, add a padded DSLR camera insert of your choosing and even a shoulder pad for added support. The most popular setup on these forums was the one listed below
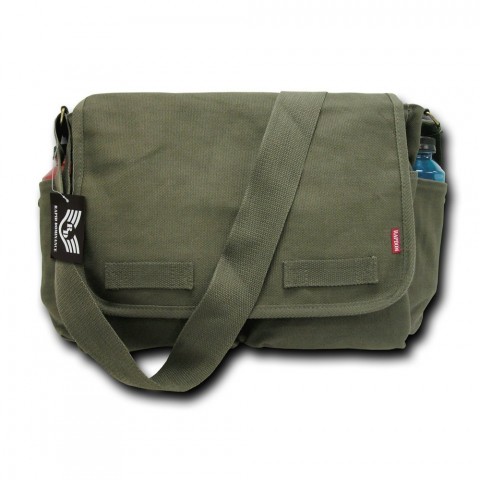
Rapid Dominance Classic Military Messenger Bag + DSLR Camera Insert + Shoulder Pad

Rapid Dominance messenger bag with DSLR Insert
Price $ $32-$73
The Bag:
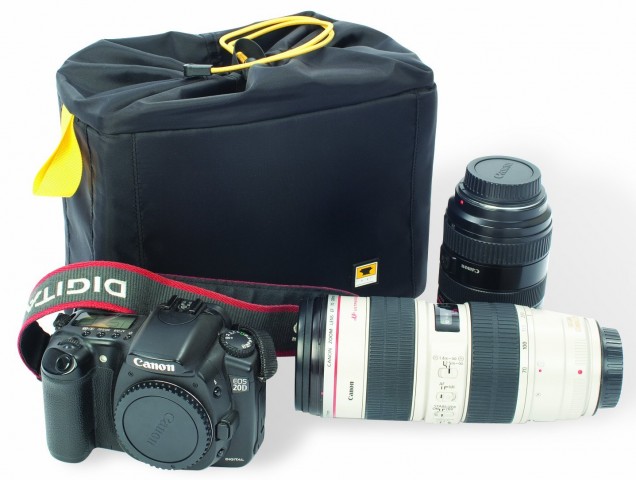
Let me first start by saying I love this bag It has 2 front pockets with zips, a zip on the main compartment with a smaller zippable compartment on the inside. That combined with the area at the back that has room for a tablet or a guidebok, plus not 1 but 2 water holders one on each end.
The Insert:

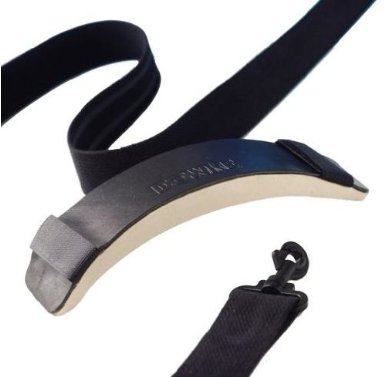
The Shoulder Pad:

What did I end up going with?
In the end I went with the DIY Rapid dominance messenger bag with National Geogrpahic Shoulder pad. I originally bought the

My Day pack setup
I test ran this bag when I had my week in California and the whole time I loved it. Everything has a place in my bag, I use one of the drink holders to hold my

These are all the things I carry in my day pack when I’m in transit. To give you an idea on how much it can hold

Its also lockable 😀
The only negative point I would say about this setup is that it can get a bit straining on my shoulder when I am wearing my big backpack and this messenger bag fully loaded up with all of my electronics. But I guess that is to be expected with so much weight in the bag. This is not an issue when I am using this as a day to day bag as I am not carrying my bag of electronics or laptop which lightens the load considerably. The other down side is that its probably not super waterproof which could be a problem if I get caught in rain, But I am probably going to just get some waterproof spray to help water make bag more water resistant. and carry a plastic bag in case I get caught in a down pour 😀

Me sporting my messenger bag in Australia 😀
If you love this post then be sure to check out my 10 Nerdy Travel Gadgets That Every Traveler Should Have!
What type of Day Pack are you using for your


Nice reviews, and good choice of bag!
Hey Brendon, firstly good luck with your upcoming adventure! As for the camera bags; I’ve been through so many, I went through a phase of buying second hand bags on the classified listings – its just so hard to find the right bag… I wanted a backpack, which would take quite a bit of camera gear (up to a 70-200mm lens), a laptop, was comfortable for hiking, could take my 15″ laptop… Went through three different LowePro bags, don’t think I’d ever buy one again now. Anyway, still looking for the perfect bag but I did end up shelling out quite a lot for a Clik Elite backpack which I’m really happy with at the moment – at one point I’ll do a review of it.
Sam recently posted..Camping in Denali National Park
Thanks Sam, Ya I can see myself going through a bag buying phase myself. The only thing stopping me at the moment is being low on cash haha. I just looked up the click elite backpacks and they look pretty awesome. I’d be keen to hear your review on it.
I think my messenger bag is going to prove a bit of a pain in the ass on hikes, So I might need to look into getting a backpack at some point in the near future